How to Prepare Your Roof for Solar Panel Installation: UK Homeowners Guide

Written By
- Alex Rohn
Published on
- 22 May 2025
Installing solar panels is a significant step towards energy independence, lower electricity bills, and a greener future. However, before installing your solar PV system, ensuring that your roof is ready is crucial for a smooth, efficient, and long-lasting installation.
This guide offers UK homeowners a complete overview of how to properly prepare their roofs for solar panel installation. By following these steps, you can ensure that your home is ready to support a high-performing solar energy system for decades to come, helping you make the most of your investment.
Why Roof Preparation Matters for Solar Panels
Your roof is the foundation of your solar panel system. Proper preparation ensures:
Maximum Solar Efficiency: Panels positioned optimally on a structurally sound roof capture more sunlight.
Longevity of Installation: A prepared roof ensures the solar system remains secure for 25 years or more.
Cost-Effectiveness: Addressing roof issues beforehand prevents costly repairs or reinstallation in the future.
Compliance with Standards: Meeting building codes and standards ensures safety and performance.
Enhanced Home Value: Homes with well-integrated solar panels appeal more to buyers and command higher prices.
A well-prepared roof protects your investment and maximises the returns from your solar PV system.
Step 1: Assess the Structural Integrity of Your Roof
The first and most critical step is ensuring that your roof can support the additional weight of a solar array.
Roof Load Capacity: Most roofs can easily handle the weight of solar panels, but a professional assessment is recommended to identify any weak points.
Identify Existing Damage: Cracked tiles, sagging areas, or leaks should be repaired before installation to ensure stability.
Roof Age Consideration: If your roof is nearing the end of its lifespan (typically over 20 years old), consider re-roofing before installing panels to avoid future disruptions.
An experienced roofing specialist or your solar installer can provide a detailed report to ensure your roof is ready.
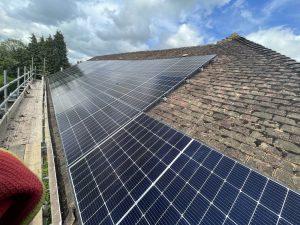
Step 2: Evaluate Roof Material and Condition
The type and condition of your roofing material impacts the ease and cost of installation.
Common Roof Types for Solar in the UK
Concrete Tiles: Common and ideal for solar installations due to their strength and compatibility.
Slate Tiles: Require careful installation techniques due to their brittle nature.
Asphalt Shingles: Found on some homes, suitable with appropriate mounting adjustments.
Metal Roofs: Lightweight and highly compatible with solar installations, offering easy mounting options.
Ensure your roof surface is stable and intact. Replacing damaged tiles or reinforcing weak areas ensures the panels are securely mounted, reducing the risk of maintenance issues later.
Step 3: Optimize Roof Orientation and Tilt
Solar panel performance heavily depends on roof direction and angle.
Ideal Orientation: A south-facing roof captures maximum sunlight exposure throughout the year in the UK.
East/West Orientation: While not as optimal as south, these orientations can still yield strong solar performance, especially with modern panel technology.
Optimal Tilt Angle: Between 30° and 40° is considered ideal for year-round solar generation in the UK, balancing summer and winter sun paths.
If your roof’s angle or orientation isn’t perfect, don’t worry. Installers can often compensate with special mounting systems designed to optimize panel exposure.
Step 4: Clear Obstacles and Shading
Shade dramatically reduces solar panel efficiency. Before installation:
Trim Overhanging Trees: Remove branches that may cast shadows on your roof, particularly during peak sunlight hours.
Monitor Potential New Structures: Be mindful of planned constructions nearby that could affect future sunlight access.
Assess Chimneys, Flues, and Vents: Panels can be installed around these structures, but shading impact and layout efficiency must be considered.
The aim is to maximise the number of panels exposed to direct sunlight for as many hours of the day as possible.
Step 5: Plan Roof Layout and Access
Proper layout planning enhances efficiency, system lifespan, and ease of future maintenance.
Panel Layout: Confirm the optimal configuration for the number of panels your roof can accommodate without compromising access.
Access Pathways: Maintain clear access routes across the roof for installers and any future maintenance personnel.
Inverter Location: Ideally, locate the inverter close to the solar array and your main consumer unit to minimise energy loss.
Thoughtful planning improves long-term system performance and keeps future servicing simple and cost-effective.
Step 6: Check Roof Warranty and Building Regulations
Understanding warranty terms and regulations is crucial before proceeding.
Roof Warranty: Ensure that adding solar panels will not void your existing roof warranty. If necessary, consult your roofing contractor for approval.
Planning Permissions: In most cases, solar panel installations on domestic rooftops fall under “permitted development” in the UK. However, properties in conservation areas or listed buildings may require special permissions.
Building Regulations Compliance: Installations must comply with UK building regulations, including structural safety and electrical standards.
Choosing certified and experienced installers ensures compliance and protects your home investment.
Step 7: Discuss Cable Routing and System Integration
Cables must be carefully planned to ensure aesthetic and functional integration.
Internal Routing: Preferable where possible, as it hides cabling within lofts or wall cavities.
External Routing: When necessary, conduits should be neatly arranged and weatherproofed.
Inverter and Consumer Unit Coordination: Keeping cable runs short improves system efficiency and reduces installation complexity.
Planning these technical details enhances system appearance and functionality, creating a seamless solar setup.
Step 8: Consider Additional Upgrades
Solar installation is an excellent opportunity to address other home improvement tasks.
Roof Insulation: Enhances your home’s energy efficiency and reduces heating costs.
Gutter Repairs: Prevents drainage issues that could affect panel stability and roof integrity.
Bird Proofing: Installing mesh barriers protects wiring and panels from bird nesting activities.
Combining these upgrades with your solar preparation saves time, reduces labour costs, and future-proofs your home.
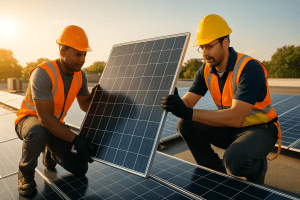
Solar Panel Installation Day: What to Expect
Proper preparation makes installation day smooth and efficient.
Access Preparation: Clear access to driveways, lofts, and electrical panels.
Scaffolding Setup: Scaffolding may be installed for installer safety and should remain in place until final checks are complete.
Minimal Disruption: Although some noise is unavoidable, professional teams work efficiently to minimise inconvenience.
System Commissioning: Once installed, your system will undergo detailed testing and commissioning before activation.
Professional installers aim to complete most residential projects within 1-3 days, depending on system size and complexity.
Best Practices for a Successful Solar Installation
Select Accredited Installers: Ensure they hold MCS certification and have a strong track record.
Confirm Insurance and Warranties: Protect your investment with proper installer and product warranties.
Maintain Open Communication: Clear, early discussions about layout, aesthetics, and performance expectations help avoid misunderstandings.
Think Ahead: Even if you don’t install a battery now, planning space for future battery integration is a smart decision.
Following these best practices ensures that your solar installation project runs smoothly, on time, and within budget.
Conclusion: Set the Foundation for Solar Success
Preparing your roof for solar panel installation is a vital step toward securing a cleaner, more affordable energy future. A little preparation today ensures that your solar PV system will operate at peak performance for many years.
By ensuring your roof is structurally sound, properly oriented, free from shading, and by working closely with a reputable solar installer, you are setting the stage for a seamless transition to renewable energy.
Investing time and attention into roof preparation today guarantees that your solar panels will deliver maximum benefits, protecting your home, finances, and the planet for decades to come.
For personalized advice on preparing your home for solar panels and achieving the best results, contact Solar4Good. Our team of experienced specialists is ready to help you take the next step toward sustainable energy.
Speak with Solar4Good to schedule your free solar assessment and learn how we can help you prepare your home for a successful solar installation.
FAQ: Roof Preparation for Solar Panels
Q: How much weight will solar panels add to my roof? A: Typically, solar panels add about 15-20 kilograms per square metre, which most roofs can easily support with proper assessment.
Q: Do I need planning permission to install solar panels on my roof? A: Most installations fall under permitted development rights, but if your home is listed or located in a conservation area, specific approvals may be required.
Q: What happens if I need to repair my roof after installing solar panels? A: Panels can be temporarily removed and reinstalled, especially when installed with future maintenance considerations in mind.
Q: Should I bird-proof my solar panels during installation? A: Adding bird-proofing measures during installation is highly recommended to prevent future issues with nesting birds.
Q: Can solar panels be installed on flat roofs? A: Yes, with the use of specialised mounting systems that create the necessary tilt angle for effective energy production.
Preparing your roof is the first step toward a brighter, more energy-efficient future with solar power. Take the time to do it right and reap the rewards for years to come.
Latest Posts


Save heavy on your power bills